Friday, February 26, 2010

What we talk about when we talk about tacos..........

Let's talk about tacos, shall we?

The word conjures up so many distinct meanings and flavor memories that by now we really ought to have broken it up into several different words for the sake of understanding, but let's work with what we've got. For some, a taco is roadside stand food, a greasy, classic staple of my particular corner of the western states and all points further south. For some, it's a homecooked meal, fragrant, slow-cooked juicy meat folded gently into a fresh tortilla by a mother or grandmother's loving hands. For Jeffrey Steingarten, it was an almost Proustian memory of perfectly grilled Tacos el Yaqui that kept him returning to the same Baja taco stand year after year (see his book, It Must Have Been Something I Ate, for this and other hilarious essays). For me it's a warm memory of American suburban childhood memory and Taco Night, the closest one could come to real live 'junk food' at home, of ground beef browned with spices and ladled into a crunchy, bright yellow corn shell, garnished with orange cheddar cheese and shredded lettuce. For still others, it's a limp stack of 3-for-a-dollar convenience food, most likely eaten in advance of an impending hangover late one night or early the next morning (the drive-thru of Shame). Even my husband, raised in Kansas City, has horrified me in the past with remembered descriptions of something called 'In-A-Tub Tacos' (from, most fittingly, an establishment known to KCMO as 'In-A-Tub'), which apparently consisted of boiled, reconstituted meat and powdered cheese deep-fried in a tortilla.

The horror.

But I want to talk about something else. I want to talk about Asian style tacos, apparently invented by a certain chain of hip LA food trucks and shamelessly appropriated by yours truly (living in Kogi-less Phoenix, after all). I've eaten a lot of things folded into tortillas over the years. I remain ever shameless about what I will consider a 'taco'.......this morning's breakfast? A single egg scrambled in olive oil with green onion bits and a dollop of hot sauce, tucked away inside a leftover corn tortilla and eaten standing up in the kitchen. The verdict? Taco. I'm willing to overlook purism. So when I glanced at an article last week about LA's currently trending Korean-Mexican fusion on wheels bonanza, I wanted in. Six hours on I-10 is a long way to drive for a taco, however spectacular, so I opted to make my own.

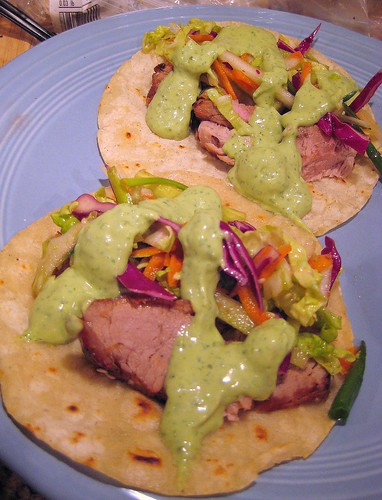
The verdict? Taco. ;)


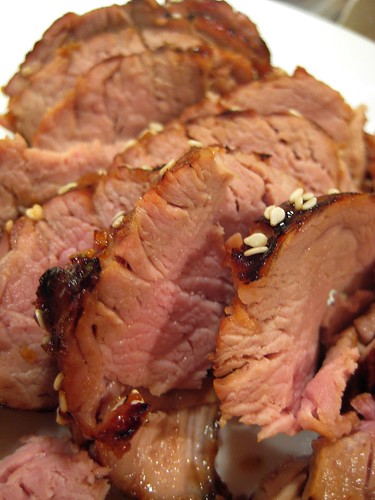
The process is as follows: First, obtain and marinate a pork tenderloin in a bath of soy sauce, garlic and ginger for at least 45 minutes. I cut mine in two to accomodate my stovetop grill pan, since it had been raining steadily all day and any hopes I had had of grilling this properly outdoors were looking mighty soggy.


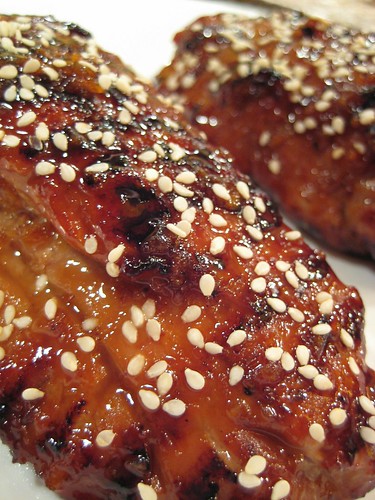
After marinating, remove the meat and pat dry thoroughly with paper towels, reserving the marinade. Heat grill pan (or, if it's not raining that day, your actual grill), brush lightly with oil, and grill your pork until both sides bear beautiful, stripey grill marks. While grilling, reduce marinade by half on the stovetop, then remove from heat and stir in a hearty spoonful of honey. Brush this sticky glaze onto the meat, then finish in a warm oven, about 375 or so, until pork is just cooked thoroughly (how long will depend upon the size/thickness of your cut of meat, so use your best method for judging 'doneness'...I used a meat thermometer). Sprinkle with sesame seeds and let rest at least 5 minutes before slicing.


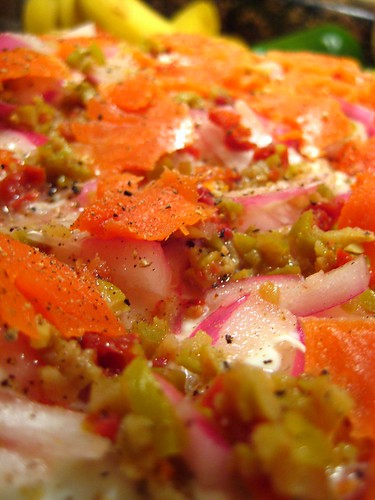
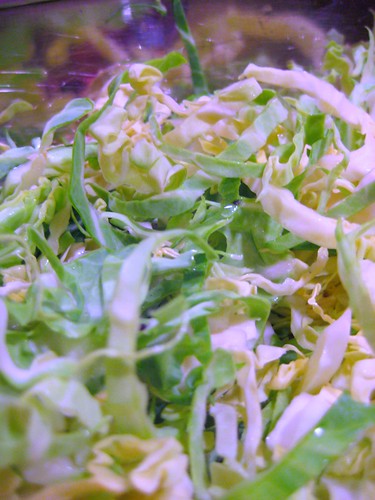
Meanwhile, chop the following into more or less evenly-sized ribbons: Napa cabbage, red cabbage, cucumber, scallion and carrot. Toss in a bowl with dressing made of rice wine vinegar, red chili flakes, a few healthy squirts of sriracha, and a pinch of sugar to make a sort of fiery 'instant kimchi' salad as garnish.


Sliced grilled pork, ready to be accompanied by spicy 'kimchi' and a drizzle of avocado-cilantro-lime cream. To make the sauce, peel, pit and roughly chop one perfectly ripe avocado. Pulse in food processor, then add sour cream, chopped cilantro and a squeeze of fresh lime juice to taste. Blend until smooth (I added a touch of water at the very end to thin it out into 'drizzle-able' consistency).


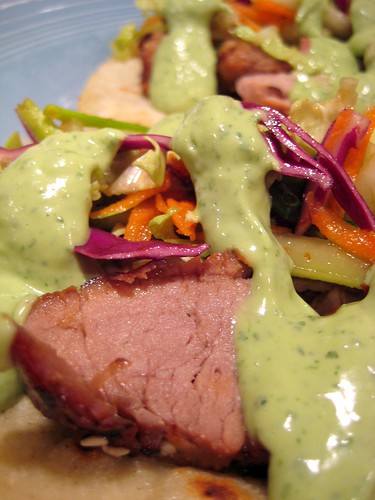
Warm corn tortillas briefly in a very lightly oiled skillet. Assemble tacos as shown above, and reconsider moving to LA, at least for the time being. Waits in line at the famed Kogi trucks are reported to be as long as 2 to 3 hours, ridiculous when you consider that you could be enjoying your very own fusion taco taste explosion at home in less than half that time. And no waiting in line, either.

Saturday, February 13, 2010

Orangettes...........


..........that's what I finally decided to make from the Oranges of Wrath. It's probably only fitting that a blog calling itself Orange & Salt should have to deal with oranges at some time or another (and with these trees dropping fruit left and right in the backyard, the time is now and the mood is somewhat desperate). Probably one of the nicest things that could happen to an orange is that it find its peel removed, cut lengthwise into strips, simmered gently in a bath of sugar syrup, sprinkled with crystals and finally robed in beautiful dark chocolate. I mean, if I was an orange, that's the way I'd want to go. Turn me into a classic French 'orangette.'

Something I feel you ought to know before we get started is that I love salt. I do. You might have, ah, noticed the name of my blog? One of the things to especially love about salt is the way it adds a sometimes badly needed edge to sweet things, especially fruit. The name of my blog, which could seem nonsensical without explanation, is based on my love of balance. Oranges are bitter, sour, and sweet all at once; salt is the natural balancing agent that, at least to weirdos like me, brings everything together in harmony. I actually do sometimes sprinkle a few crystals of sea salt on very sweet oranges before sucking away happily on their juices (not always oranges, you should try this on a perfect apple or a nectarine sometime! But the fact is that we live in Phoenix and there is usually a lot of citrus). Having said all that, I'm now actually tempted to rename these 'Orange & Salts,' because they owe a lot to the light, light shower of sea salt crystals I gave them right after sugaring them.

I've always been funny about desserts: I like them just fine, but I don't seem to have the taste for super sweetsweetsweet things on their own. When I first tried sugaring orange peels and tasted one in the process, I wasn't a huge fan. There's something almost, I don't know, 'childhood orange gummy candy' about them when they're so sweet. It's a lack of sophistication. Put it this way, orangettes without salt are like the girl next door. Pretty, very sweet, but a little annoying, to be honest. Orangettes with a hint of salt are like the same girl next door after she's gone away and studied abroad for a year, and come back with a sultry Parisian 'do and foreign perfume and a new air of mystery. There, does that make sense? Want to make some of these elegant little treats for your very own?


Start with fresh oranges, from your own backyard (organic!) if possible. What to do with all that lovely juicy orange flesh? Squeeze into a pitcher and drink, my friends. Remove peel from oranges and, with a sharp knife, slice away as much of the white pith as possible, leaving strips of pure orange peel. Slice into thin strips.

Blanch these peels quickly in boiling water three times, changing the water each time. Let the water boil first, then add the peels for about a minute, then remove and don't add them back until the new batch of water is boiling again.You do not want these to get too soggy (ask me about the failed batch I made the night before, when I made this very mistake. Go on, ask me), so keep their time in the boiling water brief. This 3 times thing may seem a little overly fussy, but it's important in that it removes most of the bitterness from the peels, and anyone who's ever bitten into a bitter orange peel won't make that mistake again. So blanch, blanch, blanch again!


Finally, make a sugar syrup that is equal parts sugar and water. Heat until all sugar is dissolved and syrup is nearly boiling, then add orange peels and reduce heat to simmer at medium. Simmer for 45 minutes, swirling occasionally (do not stir), then remove peels from syrup and let cool slightly. You can strain and save this syrup for use in iced tea or cocktails, it's a wonderful light golden color, super-sweet, and lightly scented with orange essence.

Toss the peels in granulated sugar to coat, spreading them evenly on a plate or other flat surface. Here's the important part: lightly sprinkle salt over the orangettes, then gently toss again. The key is to do it very lightly. Start with a tiny pinch, you can always add more. Taste once or twice to check flavor. They shouldn't taste salty, just sexy.


Let your orangettes set up for a few hours. When they have cooled and stiffened just a bit, prepare a dark chocolate bath. Ooooohhhhh.....a dark chocolate bath. ;)


Mmmmmmmmmm.

Holding them by one end (which I like to leave showing because the crystallized orange peel is so pretty in its own way), dip them carefully in the chocolate and lay on a sheet of parchment paper to cool.

If you're entertaining for Valentine's Day, these would be an impossibly wonderful treat to share with a glass of champagne. And if you're not.........you won't have to share. ;)

I'm easy like Sunday morning..........

Without a doubt, there are days around here when I wake up ready to tackle some new challenge in the Tricky Food arena: my first souffle (not so tricky, as it turns out), a complicated curry, a brand new cake with three kinds of flour, a page from Mastering the Art of French Cooking........there are days when this all seems like a great adventure and nothing could possibly go wrong! There are days, chez Orange & Salt, when we are just positively rarin' to go.

And then. Well. There are days when the morning alarm fails to go off, the dog needs to be walked, the deadlines need to be met, and the people need to be fed, period. Days like this call for recipes that can be eased into gently and fit as perfectly as an old, washing-softened pair of favorite blue jeans. Comforting, maybe even slightly forgiving, and ready to go in almost no time at all. Welcome to comfort cooking, Orange & Salt style.

It's not all soufflés and mousses around here, people! In fact, since we're both actively trying not to gain any weight (everyone's favorite New Year's resolution), Mike and I tend to fall back on the same marginally healthy meals quite often. Things on Bread is a popular category around here (broiled tomato bruschetta with mozzarella slices and fresh basil is our staple summer meal), as are Things Scrambled with Eggs, Things in a Bowl with Homemade Vinaigrette (otherwise known as 'salad,' although it looks different every single time), or Things Blended into Some Kind of Soup. Oh, I know you've been fooled lately by my fancy photos of pastries and homemade delicacies, but we certainly don't eat this way every day; the true fact is we're lazy folks just like everyone else who just want something good that hopefully isn't going to bloat us up to orca- or Macy's-parade-balloon-sized proportions over the long run! This is where our comfort recipes come very much in handy.


.........behold an entry from my personal favorite category, Things Scrambled with Eggs. Shown in this photo, 2 eggs scrambled with sauteed kale, garlic and red onion, dressed with a dollop of fire-roasted salsa and a sprinkling of white cheddar. Fold this charming mess into a whole wheat tortilla (hunt around at your supermarket for the kind without preservatives and extra flour additives...you have to eat them all within a few days, but they're so tasty that you'll want to!), and it's good, in my opinion, for breakfast, lunch or dinner. Done in five minutes.


There are about a million interesting way in which this could be modified, as well, which is what makes Things Scrambled with Eggs such an enjoyable category. Spinach substituted for kale would be great, of course. You could add a sprinkling of cilantro or parsley, a plop of yogurt and harissa, or swap the cheddar for crumbled feta or ricotta salata. This meal kind of begs to be taken in different directions: Mexican, Middle Eastern, Asian. It's a no-brainer, so play with your food.


Next is an important entry in the Things on Bread category! Shown above is an example of the instant flatbread we learned to make from none other than Jacques Pépin himself. It's nothing more than flour, water, baking soda, a pinch of salt and a drizzle of olive oil, but it's absolutely sublime. It's also a lifesaver when you're hungry and having nothing in the house but random ingredients that might be candidates for Things on Bread. Instant bread! Better than pizza! What could be better?

To make Jacques's flatbread, heat a 12" skillet to medium high with enough olive oil to generously coat the bottom. In a bowl, combine the following:

2 C. flour (I have used every kind of flour known to man for this, including wheat and soy flour. While they give perfectly respectable results, you might want to use regular all-purpose flour, at least the first time around)
1 T. baking soda
1 tsp. salt
1 1/2 C. water

Stir until everything is combined, the result should be something like a thick batter or very, very loose dough. Pour into hot pan and spread with the back of your spoon until bread more or less reaches the sides of the pan and could be called, you know, 'flat.' Continue cooking on one side until bread starts to form attractive little brown blisters on the side facing down (see photo), 5-7 minutes. Drizzle the side facing up with a little extra olive oil. Flip it. If the thought of flipping it in one smooth motion like Jacques or Julia fills you with unholy terror (and who can blame you?), use a spatula, but be warned: This bread is fragile! Think of it as more like a giant pancake or biscuit which, at its essence, it is. It's liable to crack apart on you if you hesitate, so whatever your method, be quick with the flipping.


This recipe in its above incarnation is actually a Frankensteined version of two Jacques recipes wedged into one (in case it hasn't become obvious by this point, we are big Jacques disciples around here, in fact, my husband even credits the man with having taught his adolescent self to cook in the first place! Through the power of television, that is, alas, not in person. Jacques, call us!). His original recipe for 'Smoked Salmon Pizza' used storebought lavash bread as a base, which is also quite tasty but not as sturdy as you might hope. We knew when we
found his flatbread recipe that we had a winner!
To make this 'pizza,' layer one finished flatbread with a thin smear of sour cream (Greek yogurt might also be nice), thinly sliced red onions (raw or pre-marinated in a little red wine vinegar), smoked salmon pieces, capers (it's obvious the grocery budget was running a little low this particular week, because in the photos we actually have finely chopped green olives standing in for pricey capers. Both are good, the main point is the hint of salt.) and plenty of freshly ground black pepper.


As with all of our comfort recipes, this one has appeared on our table with endless variations. The same way you can pair a different top every day with those favorite old blue jeans and come up with a thousand 'new' outfits, comfort foods are by their very design easy to fool around with and recombine in subtle new ways. The above entry in the Things on Bread category is also especially good under a thick green blanket of chopped baby arugula, or with a sprinkling of fresh dill. One ambitious evening, faced with a little leftover roast chicken, a tomato, and half a ball of mozzarella, we even made something more closely resembling a traditional pizza. It was delicious, and best of all, it was easy. Just like Sunday morning. Or any time at all.

Sunday, February 7, 2010

Pasta with Ham, Pecans and Brussels Sprouts, & becoming Mrs. Goodcrumble.........


I'm a winter lover, a defiant flag on the hill waving in the face of my heat-loving brethren in Phoenix. I stand outside and cheer for heavy, grey rain clouds, encouraging them further and further until they blot out the sun. I love the first hint of chill in the air we start to feel in November after a long, long summer, and am always a little reluctant to give it up again when early spring starts to make itself known around this time of year. And as happy as I'll be to be up to my ears once again in corn, tomatoes and fresh basil come summer, I am winter's faithful hanger-on, and I'll be eating winter foods for as long as is realistically possible.

Which brings me to Brussels sprouts.

I really think these long-maligned and much neglected little crucifers deserve much kinder treatment than we usually give them; a long bath in steam or the even more traditional boiling water does absolutely nothing to bring out their nutty, savory appeal and everything to make them into limp, soggy tummy-bombs instead. So unfair! Brussels sprouts are high in vitamin A, C and fiber....but even importantly to me, they are delicious. Although even I have to admit, it wasn't until a houseguest of ours last year showed me a different way of preparing sprouts that I even reconsidered them. He showed us that they could be sauteed lightly in olive oil and finished with garlic and lemon juice so that they were bright & sunshiny, crunchy and caramelized. Ever since then I've been in love with the humble sprout, and when I came across this recipe, I bookmarked it immediately, knowing I'd try it the very first chance I got.

This is adapted from a recipe at the lovely Molly's Orangette blog (which she herself adapted from a recipe in the sadly now-defunct Gourmet magazine; in this incarnation it's known as Pasta with Hashed Brussels Sprouts, Ham and Pecans). Hers featured pine nuts, mine gets its nutty kick from pecans, instead. Although I fully support her reasoning that the nuts need to be toasted separately and added at the very end to retain their character, as well as her addition of just he tiniest bit of cream. What recipe doesn't benefit from a few helpful glugs of cream? Finally, a few pink slivers of ham here and there add colorful zest and flavor, and a light sprinkling of Parmigiano at the end rounds out the nutty flavors and ties everything together. It's addictive, and let's hope so, because we're having the leftovers today!

Pasta with Hashed Brussels Sprouts, Ham and Pecans

(Adapted from Orangette)

¾ lb. Brussels sprouts, trimmed
3 Tbsp. pecans
½ lb. dried pasta (I used fettucine)
1/8 lb. chopped ham (I started with sliced smoked ham from the deli, and it was perfect)
2 Tbsp. olive oil
1 Tbsp. unsalted butter
1 clove fresh chopped garlic
½ tsp. salt
3 Tbsp. heavy cream
grated Parmigiano-Reggiano cheese

Preheat oven to 300. Place a large pot of salted water for pasta over high heat. Slice the Brussels sprouts finely using a very sharp knife or mandoline (I love using the mandoline, it makes everything come out evenly and thus, cook evenly. At least, in theory.), set aside. Roughly chop pecans and spread evenly on baking sheet, bake for a few minutes in warm oven until just lightly toasted (keep an eye on these, nuts tend to go from fragrant & golden to irretrievably burnt quickly).

When the water boils, add the pasta and cook until al dente. Remove and drain (reserve a little of the starchy cooking liquid if possible, it's full of flavor & body and is great to add to your pasta later if it needs a little extra moisture).

Place a large skillet on the stove and heat to medium-high, add the olive oil and butter and let everything get pretty toasty. Add sliced Brussels sprouts and ham and sauté, stirring frequently, until sprouts are bright green and barely tender, about 3 minutes. Add chopped garlic and saute a minute more. Remove from heat, add cooked pasta, and toss. Add the pecans and cream, and toss again. If the pasta seems a little dry, now is a good time to add a splash or two of your reserved cooking liquid. Taste & add a good pinch or two of salt as needed, as well as freshly ground pepper. Serve immediately, with grated cheese.


After our pasta with Brussels sprouts, there was an apple crumble. Have you ever heard Eddie Izzard's bit on his former music teacher 'Mrs. Badcrumble'? It's hilarious, but more to the point, the making of crumbles always finds me giggling to myself in the kitchen, slicing fruit or wiping flour from my hands and muttering softly, 'Mrs. Badcrumble.........Mrs. Badcrumble............'. Well, after masterminding the recipe shown below, I think it's safe to annouce that you may call me Mrs. Goodcrumble. Unless you are Eddie Izzard. In which case you should just call me. ;)


Mrs. BadGoodcrumble's Brown Butter Pecan Apple Crumble


4 Granny Smith apples
3 Tbsp. sugar
1/4 tsp. cinnamon
1/4 tsp. ground ginger
1 tsp. cornstarch
3 Tbsp. pecans
several gingersnap cookies, crumbled into small pieces (optional, because I just happened to have these this time around, but highly recommended)
6 Tbsp. butter
3 Tbsp. brown sugar
1/2 tsp. salt
1/8 C. flour
1/8 C. rolled oats


Preheat oven to 350. Peel and slice apples thinly (again, I love my mandoline), toss in a bowl with sugar, cinnamon, ginger and cornstarch until coated. Layer evenly in a pie dish or small casserole and set aside.


Place 3 Tbsp. of butter in a small saucepan and heat over medium high heat until butter takes on a rich, nutty brown color (swirl often and do not allow butter to burn!), Remove from heat and set aside.


Roughly chop pecans, place in a bowl with oats and crumbled gingersnaps (if using), then pour brown butter over these and sprinkle with salt. Toss to coat and set aside to cool. Take remaining 3 Tbsp. butter and cut into pea-sized chunks. Rub these into the flour as if making pastry dough until everything begins to look 'crumbly,' then add brown sugar. Rub between your fingertips for a minute longer, then add oat/pecan/butter mixture and continue until all the dry flour is absorbed and the mixture looks like delicious crumb topping. Does it look good enough that you sneak a bite of it from the bowl? Good. On we go.

Sprinkle topping evenly over sliced apples in pie dish, and press down veeeeeerryy lightly with your fingertips here and there (it's supposed to be crumbly, get it?? But a little help here and there doesn't hurt, either.), then slide into the middle of your hot oven and bake for 40 min. Fruit should be bubbly around the edges when you remove it, and the crumb crust should be nicely browned. Let cool, then serve the way we ate it, with freshly made cinnamon whipped cream. Mrs. Badcrumble would approve.


Monday, February 1, 2010

Where the Buffalo Roam.........

I was lucky enough to have this for dinner the other night, the night we were glued to the State of the Union Address in fact, and I've been dreaming about it ever since (plotting strategies to get it back on my plate soon). Buffalo burgers with roasted garlic mayonnaise and baby arugula, with oven-baked polenta 'fries,' I simply cannot say enough good things about this combination. It's sublime. A few quick words on red meat in general: we love it, but we lusty carnivores don't eat much of it. Beef, that is. Knowing what we now know about the abominable state of modern agriculture and beef-producing factories, well, it makes it difficult sometimes, know what I'm saying? Every once in awhile we do give guiltily in to a good steak, but for the most part we abstain. Buffalo, on the other hand.....oh my goodness. It's like beef's more handsome older brother comes home from college for the summer and you develop an instant and unforgettable crush and beef is forgotten and all you want from then on is buffalo. It's a lot more pricy than your average pound of ground beef, but also a lot less frightening ('Food, Inc.', anyone?), and it's worth the piece of mind. Buffalo has less fat and more iron than traditional beef, and a really lovely, sweet flavor. Besides, even at several times the cost of beef, one pound isn't likely to break anyone's budget.


Prepare polenta according to instructions on package or the way mama used to make it, whichever is your bag. Personally, I like it with a little milk and chicken stock whisked in with the plain water. For this recipe, I also finished it with a handful of chopped fresh Italian parsley and some grated Swiss and a tiny bit of this maple smoked Gouda we had all but polished off (okay, you caught me, I was cleaning out the refrigerator with this one. Parmigiano would have been great, too, or Gruyère--you can just never go wrong with Gruyère!--but it's not a bad way to use up the ends of random cheeses, either), which gave the polenta an amazing, rich creamy smoky background. Spread in a baking sheet and let cool thoroughly. Be patient. After it has solidified and cooled, slice the polenta into french-fry sized strips, toss gently with olive oil, and bake at 450 degrees for about 40 minutes, turning them once halfway through the cooking to let them brown on both sides.
Polenta fry interior closeup! I don't quite know how to describe the taste and texture of these to you except, frustratingly, 'yummy'?? I for one prefer them to regular french fries, and that's a bold statement. They have this fantastically caramelized, brown crunchy exterior that gives way to a creamy interior that is just.....well, you just have to experience it for yourself. Don't forget the cheese!


For the burgers, first roast an entire head of garlic (I love a recipe that starts out with an entire head of garlic, don't you?) until it's brown and soft. Squeeze the unbelievably aromatic cloves into a bowl and mush them into a paste with a spoon. Add mayo, salt and pepper to taste, along with anything else that sounds good to you; a squeeze of fresh lemon would be good here, or you can do what I did and add a hefty plop of fancy mustard (Maine maple-champagne mustard from Whole Foods, to be exact, because I'm the kind of girl who absolutely can't resist a fancy mustard--or five--and because I thought the maple in the mustard might compliment the maple smoked Gouda I slipped into the polenta).

Briefly saute a little diced onion in about a tablespoon of butter, just until soft. Take a can of diced tomatoes, drain thoroughly, and add to the onions for a few minutes. After everything smells terrific and is starting to melt together, remove from heat and let cool. Mix tomato mixture into one pound of ground buffalo, gently and by hand. You don't need to over-mix this, just combine them. Form patties by hand (this makes about 4 large patties, but you could stretch it further if you have smaller appetites to feed) and cook according to your preferred burger-cooking method. I cooked ours in our stovetop grill pan, brushed very lightly with olive oil.
Assemble on bread of choice: bun, ciabatta, baguette slices. Spread one side generously with roasted garlic mayo, add a handful of tender baby arugula leaves, press together, and there you go! Mmmm. Buffalo.